Author:Military Drone Manufacturer TIME:2026-10-10
For FPV drone projects, review the RA7 Handheld Ground Station by putting its operator layout through a short desk session with the intended users and accessories. Look at screen access, hand reach, control identification and clearance around the top and rear of the unit. Record the supplied control map and any grip changes needed to reach a function. The brochure shows the layout and lists a 16-channel specification, but it does not establish comfort, application mappings or accessory fit for your team. A useful review leaves a labelled layout reference and specific observations tied to the sample, rather than a general statement that the terminal feels good.
The RA7 photograph places the display between two grips. A stick and other physical controls sit near each hand, with additional controls visible above the screen. These are useful visual landmarks for a discussion with the supplier. They do not tell you which input performs which action in your application, or whether the pictured screen matches the software delivered with a sample.
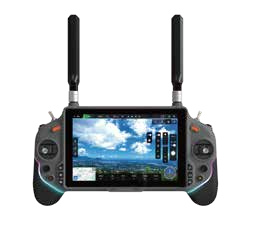
Ask for a simple labelled control map that uses the same viewpoint as the photograph. Give each visible input a stable identifier, then record its assigned function or mark it unassigned. Distinguish a printed label on the enclosure from the function configured in software. A function may change with an application or profile, while the physical label stays in place.
The brochure lists 16 channels. That number is not a description of sixteen labelled buttons, nor does it define the application's input map. Keep the supplier's channel specification separate from your operator's annotated layout. For inspection or classroom training, the useful question is whether the intended users can identify the controls they need without guessing or relying on a remembered demonstration.
Choose a few ordinary interface tasks before handing the sample to an operator. Examples include finding a status field, opening a menu, selecting an approved screen and reaching a labelled physical input. These are observations of the handheld interface. Use a supplier-approved demonstration or a safe test screen with external equipment disconnected; a handling review does not require a flight or an active machine.
Keep the tasks brief and consistent between reviewers. If one person explores freely while another follows a fixed script, their comments describe different experiences. Ask each reviewer to begin from the same screen, with the same support arrangement and accessories. Record whether the task could be completed while the terminal remained supported in the way the team expects to use it.
Include the people who will actually hold the unit. A trainer, a technician seated at a desk and an inspector carrying other equipment may favour different arrangements. Document those differences rather than averaging them into one comfort score. Where gloves are part of the intended workplace, include that requirement in the sample discussion; the brochure does not establish glove operation. Let an unresolved requirement remain open until the agreed setup has been examined.
Compare the bare terminal and proposed assembled version without changing the screen tasks between them. If the reviewer changes grip only after an accessory is fitted, keep that distinction in the notes. Also note whether the unit rests on a desk between tasks or remains in the hands throughout. Those details help explain a comment about support without claiming a measured comfort advantage for either arrangement.
Start by reading the intended application at its normal display settings. Ask the reviewer to identify a small field, a warning area and an ordinary menu label. Note where the application places these items and whether the reviewer needs to tilt the unit or move a hand to see them. This separates a problem with the screen arrangement from a problem with the application's chosen text size or layout.
Next, observe touch access. Can the reviewer reach the menu items you selected without losing support of the terminal? Does a hand cover information that the reviewer needs to read? If a task requires a grip change, describe that change plainly: left hand supports the unit while the right hand reaches across the display, for example. Do not label every grip change a fault. Decide whether it fits the intended task and support arrangement.
A photograph cannot answer these questions, and a published brightness figure would not prove that a particular interface is readable. The RA7 source has inconsistent display entries, so obtain the corrected display specification separately. Any daylight visibility requirement needs defined conditions and evidence from the offered unit. Record a desk observation as a desk observation, with its lighting and application settings; it is not an outdoor readability result.
The angled brochure view helps identify areas that a straight front photograph can hide. Look at the upper controls, the space around the antennas and the relationship between the handgrips and screen. Use this view to decide where you need a closer look on the sample, rather than estimating dimensions from an image taken at an unknown scale.
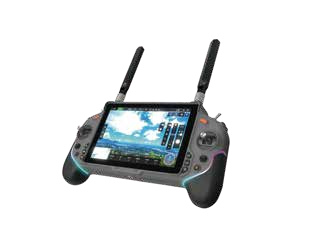
Fit the actual strap, support or protective accessory proposed for the project, if one is being considered. Then observe whether it obscures labels, presses against a control or changes the way the reviewer supports the terminal. Accessory fit is specific to the accessory and terminal revision. A supplier's statement that a case is suitable should identify the exact case rather than a generic description such as handheld-controller case.
Review carrying and storage as separate tasks. An accessory may leave controls accessible during a desk session yet make it difficult to place the terminal in its transport case. Note contact points and areas that need protection. Do not bend antennas, adjust assemblies or infer safe adjustment limits from the photographs; obtain the supplier's handling instructions for the delivered unit.
The rear photograph shows surfaces and a handle that are not fully visible from the front. Ask for rear and side photographs of the sample as supplied, including any fitted accessory. Compare those pictures with the unit you examine. This is a useful way to notice a mounting difference before an operator's review is attributed to the wrong configuration.
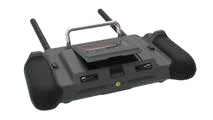
The description supports an external expansion battery. It does not identify the included pack, its attachment or the resulting operating duration. If expansion is part of your intended setup, ask the supplier to identify the approved pack and demonstrate the assembled arrangement. For this review, focus on where the accessory sits, whether it changes support in the hands and whether the proposed case still accommodates the assembly.
Do not infer electrical compatibility from an accessory fitting neatly. Battery approval, charging arrangements and supplied documentation need to be resolved by the responsible supplier. Keep loose accessories separate in the record from parts attached to the terminal. The reviewer should know which arrangement was assessed, especially when an observation concerns rear clearance or balance rather than the bare handheld unit.
Comments such as awkward or comfortable are a start, but they leave the supplier little to respond to. Write down the task, the part of the layout involved and what the reviewer actually did. Add the consequence for that task and identify what needs another look. The table below gives examples of how to frame a finding; these are proposed records, not results from an RA7 test.
| Comment to clarify | Record from the session | Useful next action |
|---|---|---|
| A screen item is hard to reach | Item location, supporting hand and grip change needed | Review the application's layout or the intended support arrangement |
| A control is difficult to identify | Physical label, map identifier and assigned function | Resolve the label or mapping difference with the supplier |
| An accessory gets in the way | Accessory part reference and exact contact or obstruction | Review that accessory on the same terminal revision |
| The fitted unit feels different | Bare or assembled condition and where support changed | Compare both arrangements with the intended users |
Separate observed issues from untested requirements. If no proposed transport case was available, write case fit not reviewed. That is more useful than a blank box that could be mistaken for approval. Where two reviewers disagree, preserve their task and support conditions. Different comments can reveal a real role difference, rather than an error to be erased from the record.
No. Request a labelled map for the delivered application and profile. Keep channel information separate from physical input identifiers, including inputs that are not assigned.
They show the arrangement, but hand reach and support need a sample review with your intended users. Record the task and accessories alongside each observation.
The brochure description supports external expansion, but the available evidence does not settle the ordered pack or its inclusion. Ask for the exact supplied assembly and approved battery reference.
Record the system used so the screen and mapping observations are traceable. Android 15 and Ubuntu 20.04 are listed options; software qualification is a separate decision requiring the specific application and image.
No. It establishes observations under the recorded conditions. Outdoor visibility and longer use need their own agreed evaluation; neither result can be inferred from a short indoor session.
Save one annotated front photograph and one view of the fitted rear arrangement. Put the sample identifier, application profile, system revision and accessory references beside them. Add the tasks reviewed, the people or roles represented and the unresolved fit questions. Keep the approved control map with these pictures so a future reader can understand what each observation refers to.
The RA7 Handheld Ground Station product page provides the reference hardware facts. Match those facts to the supplied sample, then retain your layout record as a separate project document. If a later unit has a different control label, image revision or fitted battery, compare the affected area before carrying the earlier handling approval forward. The next useful step is a sample session with your actual screen and proposed accessories, followed by a short record of what the operators could reach, read and identify.

 Tel: +86-13959965075
 Email: info@fpvdroneskit.com
 MP/WhatsApp: +86-13959965075
 Manufacturer Address:Quanzhou Valley Nanan Science and Technology Innovation Center, No. 89 Shijing Avenue, Shijing Town, Nanan City, Fujian Province